Architecture aims at Eternity
KERSIN ONG
Project 1: modelling of an architectural design
Work in progress:
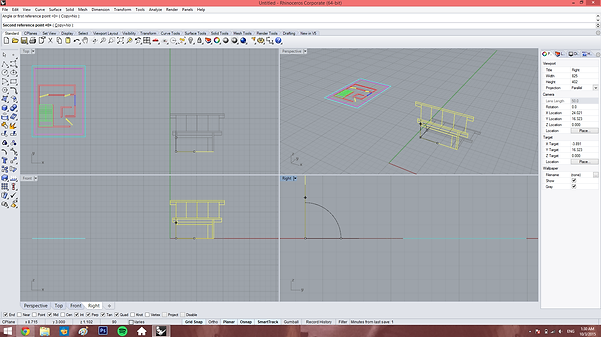
First step was using Autocad to trace all the drawings like floor plans and elevations.


After tracing all the drawings, I imported all the traced drawings into Rhido to make 3D model of this structure because this structure has curvy floor and roof so it's easier using Rhino.

It is more convinient here after tracing all the drawings. I straight away used the traced drawings, rotate them using Rotate 3D so that they can stand vertically and move them all to the plan using Move.

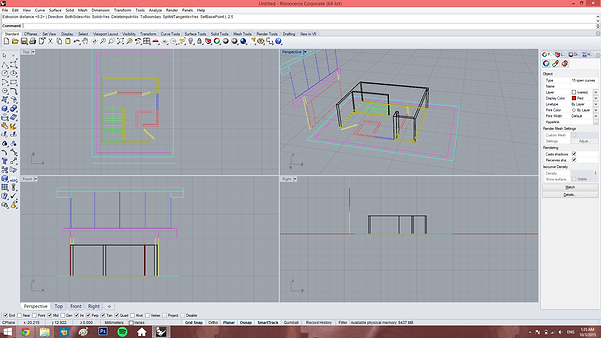
After all of them are in place, I used Surface to make them enable to extrude. Then i used Extrude to extrude them into the respective thickness. By using the same steps, all the other walls and floors had been extruded and moved into respevtive position according to the floor plan and elevation.


PROJECT 2: RENDERING WITH MATERIALS, LIGHTS, CAMERA VIEWS WITH SITE CONTEXT
Work in progress:
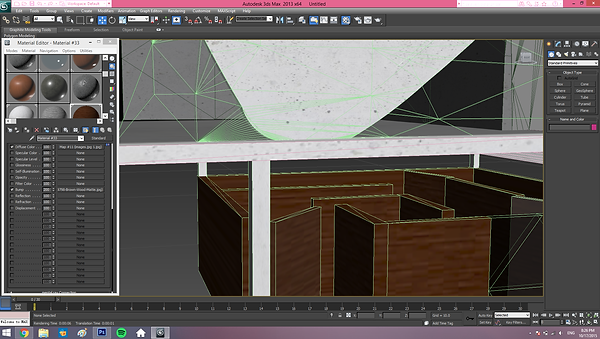
Project 2A: In this project, we were to render the exterior of the selected building using 3DS MAX. First step I've done was to save the Rhino files as 3Ds files then imported into 3Ds Max for rendering. After that, I've changed the renderer to NVIDIA mental ray.


Then, I used "Material Editor" with the mode of "Compact Material Editor" to render my building. To further increase the realistic of the material, I've edited the "Bump" for the material using Photoshop and then added into the "Bump Mat" of the renderer where I could adjust the intensity of it as well.

Next, I've used the modifier "UVW Map" for my timber wall to adjust the thickness, orientation and also the length of it. This creates a more realistic result for the material.

As for the daylighting, I've used the "Daylight" to create the sun light effect and also two free lights to lit up the darker sides of the building for a better view.


After all renderings, two target cameras were set to have two views for further rendering. One was at eye level (1.5m) and the other one was at bird view.
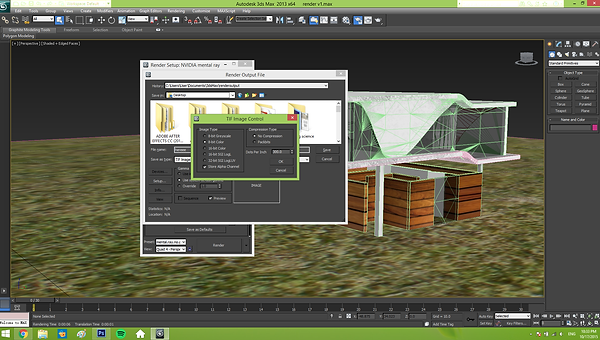

At last, I've exported my rendering of the building using the "Render Output" in "Render Setup" for further rendering in Photoshop. The important steps were to tick the "Store Alpha Channel" and to set the format in TIF files so that the files could be imported in Photoshop.

Exterior rendering at eye level (1.5m)

Exterior rendering at bird view
Work in progress:

Project 2B: In this project, we were to render the interior of the selected building using 3DS MAX. In the interior rendering, the most important step was to add the MR sky portal at the sides with openings to ehance the lighting inside the building. We can set the multiplier to adjust the intensity of the light.

After adding the furnitures, I've added the target lights using Photometric web to make the lighting effect better. Except from this, I've used other target lights with spehere shapes as well.

Cameras were set at eye level (1.5m from the ground) to get the interior views. Besides, the camera are modified with "Camera Correction" to make the view more accurate.

Interior rendering 1

Interior rendering 2
This project involves the production of a maximum 90 second animation of the completed 3D scene using 3DS MAx's animation commands and tools.
PROJECT 3: animation

After knowing the storyline of the animation, the paths and cameras had been set to capture required scenes for the animation. The first step was to create a path for the camera using the "LIne Tool". After creating the required path, a target camera had been set to capture the scenes.
The camera had been asigned with "Path Constraint" in the "Motion". The camera had been added to the path (line created earlier) by pressing the "Add Path" button.

The "Follow" and "Bank" button under "Path Options" had been enabled to allow the movement to be more natural and smooth.
The "% along path" had been adjusted to allow a distance between the camera and the target.


Next, in order to make the path more natural, the path has been added with the "Edit Spline" modifier and enable the "Smooth", so that we can adjust the corner to be smoother.


For the falling leaves effect, I have created a "PF Source" and enabled "Geometry" in "Shape Display" and disabled "Shape" so that the leaves can be seen falling down.


To further improve the effect, I have created a "Gravity" force under the "PF Source" to allow the leaves to be attracted to the force as if the leaves are falling down on the ground.
Also, the "Force" has been added into the particle view of the PF Source and the gravity has been added into the "Force" to enable the effect of gravity.
FINAL ANIMATION